
Introduction
We all know how important privacy is today. The definition of this word is very broad and varies depending on the context. In general, it is the right to keep our data / habits / behavior private. Only we decide whether we want to disclose them publicly or we want to keep them for ourselves. Let me emphasize: The law - that is, a set of rules of conduct - do we obey it? Unfortunately, not always.
Where is the problem? I think it is in mass informatization. Over the past decades, we have achieved - as humanity - gigantic technological progress. Its main result is the creation of the Internet, which gives us unlimited access to data and information. This progress was so sudden that the legislative process was unable to keep up with the avalanche of information that was posted there. The Internet is the wild west of data exchange.
Let's move from humanity in general and focus on the individual - preferably on you, dear reader. I mentioned that the definition of privacy varies depending on the context - on the Internet, privacy and anonymity are two concepts that are very close to each other. Everyone wants to be anonymous on the internet. We certainly do not want our data to be made public. Our image in particular - lack of it on the Internet that seems to makes us anonymous, right? What if, at this very moment, I shared a photo of your face on social media without your permission? You certainly wouldn't want that. Let's move on to a more important point - Would you be able to publicize an image of a stranger? Probably not, but you may have done it before and weren't even aware of it.
We will fix it. Today, I will show you how to keep the anonymity of people who accidentally found themselves in your photo. We are going to use JS and a great library for that.
Essential tools
It's JavaScript, so you'll need a programming environment for that language. The simplest IDE is enough for us. Other essential tools include Node, git and npm installed. I assume that you have already had your first steps in JS behind you.
I have also mentioned the library - our project will be based on it. It is a library for detecting faces in photos - here you will find all the information concerning about it. It will be a project based on Node.js - to simplify the work, we will also use Express.js. Thus, we are left with the last issue - bluring our face. For this purpose, we will use the stackblur-canvas library, which will allow us to blur the faces we want to remove from the photo. Ultimately, our dependencies should look like this:

We already know what we need; now we need to know what it is supposed to look like.
Concept
Programmers are lazy creatures - they are looking for the simplest solution. We will also not rely on an overconfigured concept. Basically, we need to know 2 basic things:
- What does your face look like?
- Who else is in the photo?
Simple. In theory. To recognize your face and the faces of third parties, we will use the face-api.js library and one of its features for face comparison. To remove them we will need stackblur-canvas. What about the end result? I think it will also be a good idea to allow download of the photo. I think these 3 steps in our wizard should be enough:
- Choosing a reference photo (with your face),
- Selecting a group photo,
- The end result with photo download option
Wireframe / Design
A good design of each application is essential. Looking at it, we immediately know what the flow is and the purpose of the application is. We will not be an exception. That's what we want to achieve as well so it's time to roll up your sleeves and draw something - here's what I came up with:

Okay, maybe I don't have a talent like a real designer, but I think it allows you to see the flow of our application. As you can see, we need three sections that correspond to those described in the concept. Each of them depends on the previous one. We cannot show the result if we do not have a reference and group photo. The same goes for the group photo section - without a reference photo, we can't do anything with it.
Programming:
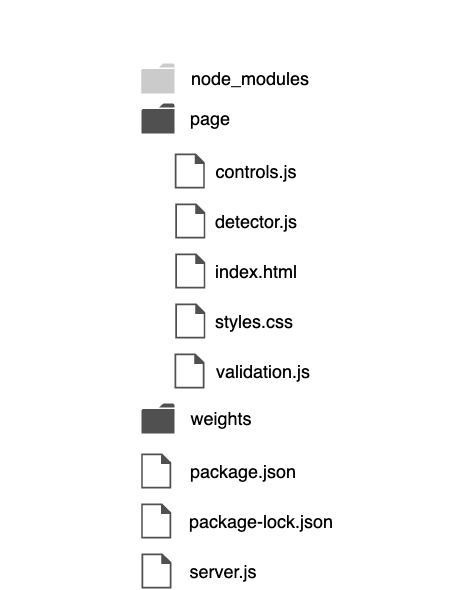
File structure
The structure of the project is very simple. First of all, we need a place to store our static site. Owing to that, we'll have a place for our 'weights'. I will use: ssd Mobilenetv1. Of course, you also need the main file that will start it all. Getting to the point, our structure will look like this:
Server preparation
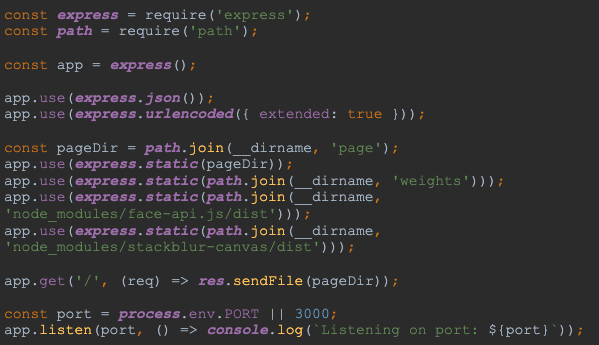
Now let's get ready to serve our static HTML page. We will use the Express.js library for Node.js for this purpose. Nothing complicated. First of all, we need to import the library and initialize express in our server.js file:

According to the art, we should also add 2 lines to parse our POST or PUT queries. We are not going to use such requests, but it is still a good practice:

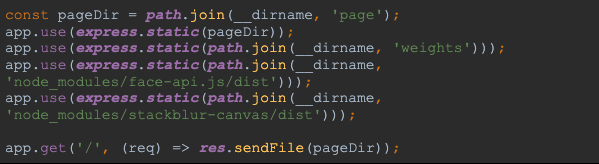
Now we need to provide our static website with an access to the libraries we need. For this purpose, we can serve them using the express.static () method, in which we provide the path to the file. We can also serve our static page right away under the '/' path:
Is that all? Of course not! The thing missing is listening to the incoming requests. Thanks to it, we can answer them correctly. It is also a good practice to treat the port as an environmental variable. Finally, our server.js file should look like this:
Of course, it won't work yet as there's nothing in our page directory yet. It's time to change it!
Serving a static page
First of all, we need to create appropriate files. As you saw have seen above (in our file structure) we will need a total of 6 files. Let me introduce them to you:
- controls.js - in this file we will store logic to hide and show specific sections and the loader.
- detector.js - this file will be responsible for the logic related to face detection.
- validation.js - the name speaks for itself - it will include functions for validating selected photos.
- index.js - an input file responsible for communication between individual files with functions.
- index.html and styles.css - files with our view.
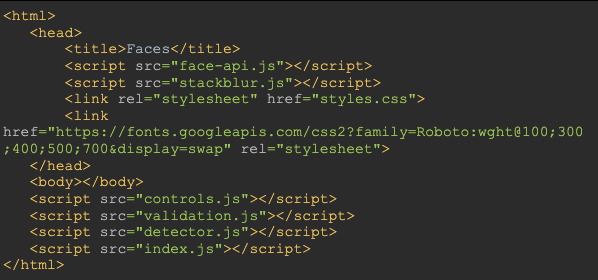
So let's create index.html. Let's attach files with our styles and js files in it. Files with our libraries will also be useful. I will also add a Roboto font from Google Fonts:
Now our server can serve a static HTML file (default - localhost:3000).
Logic of showing and hiding sections and loader
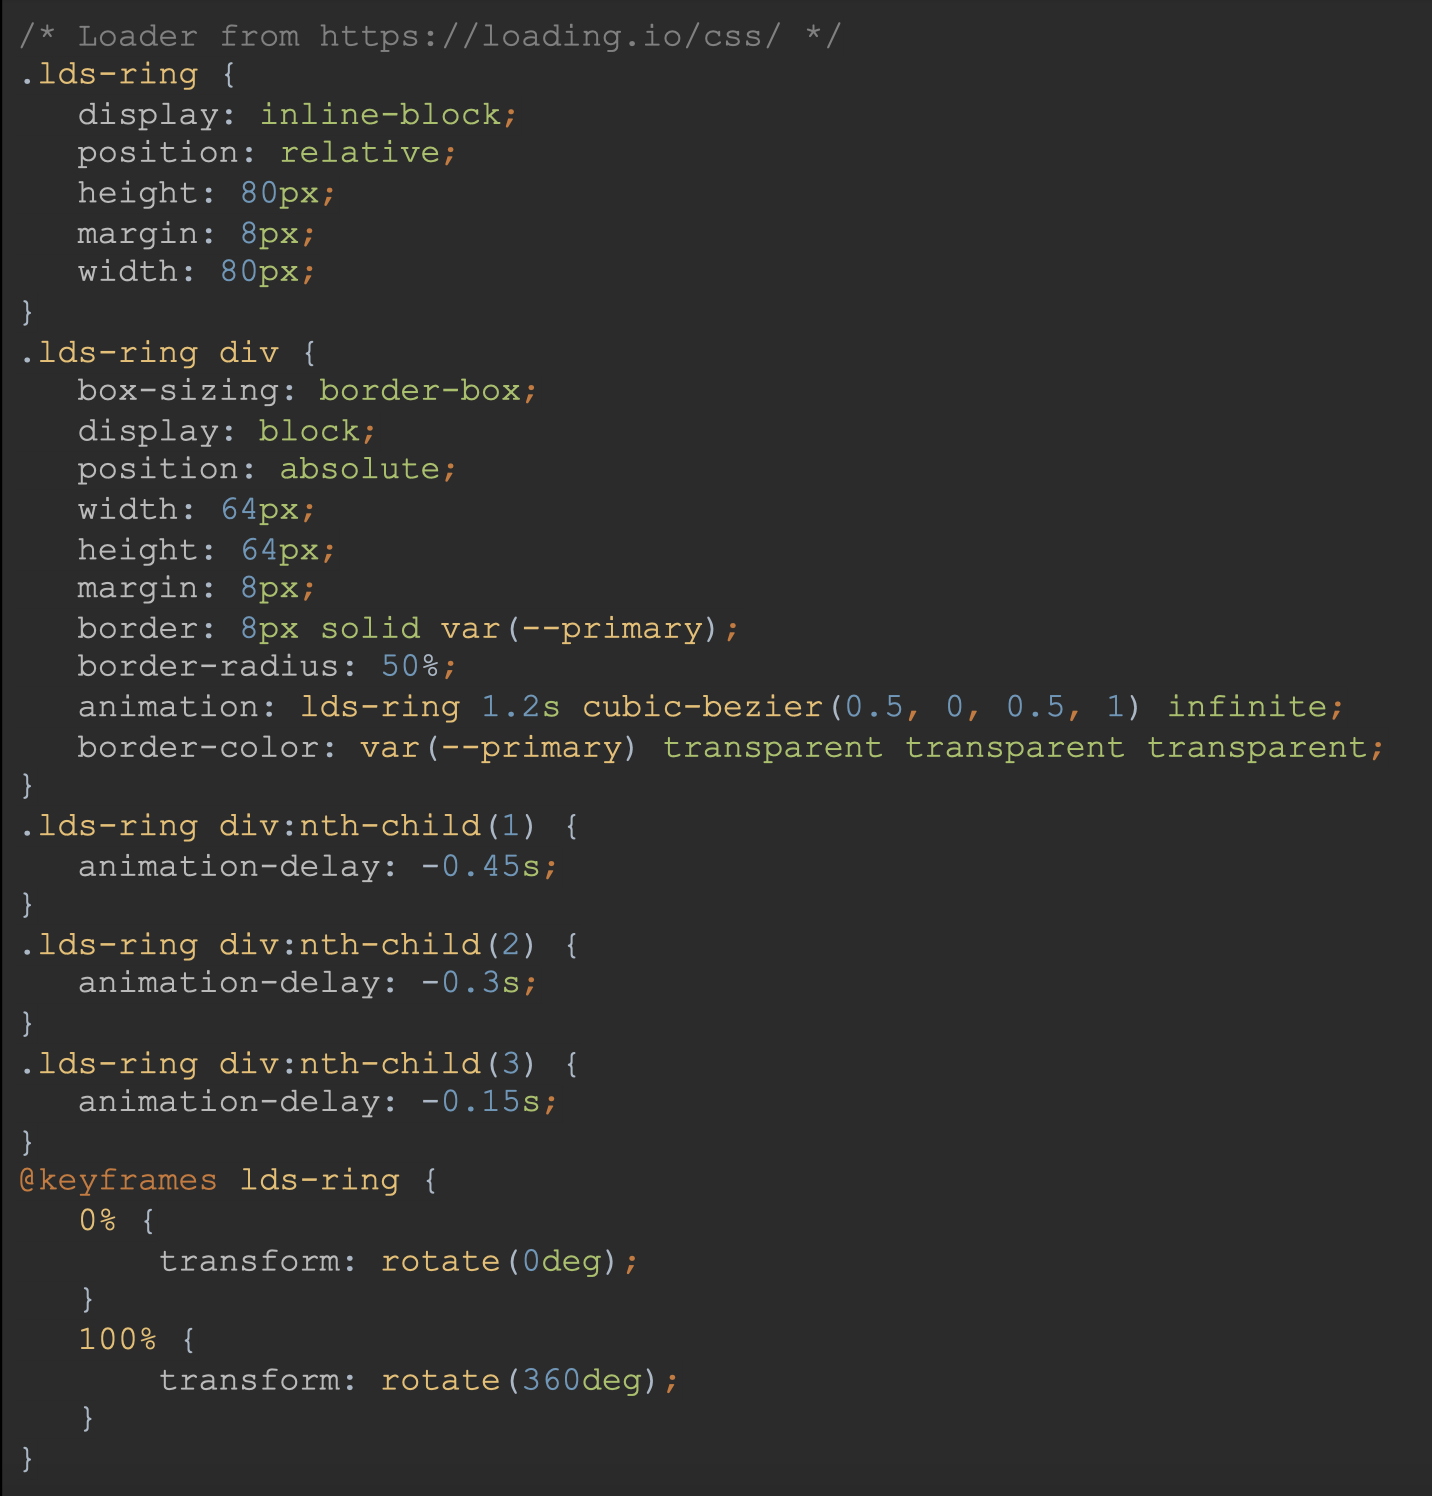
We can now focus on the dynamic part of our view. I mean 2 elements: sections and loader. The loader will primarily serve us for UX purposes. Working with the face detection library is mainly based on asynchronous actions - naturally there is a need to inform the user what is happening in the application now. I think that we can use one of a ready-made solutions for this - you will find them here. Let's put it in the <body> element. I have also added some text to it to display information about notify the user what the application is doing at the moment.

We can now move on to styling (the style.css file). I will use the BEM styling methodology. First of all, let's define the variables in which we will store the colors of our application:

Then we can proceed to define the styles of our <body> element:

This way we can create styles for our loader, here's how I have done it:
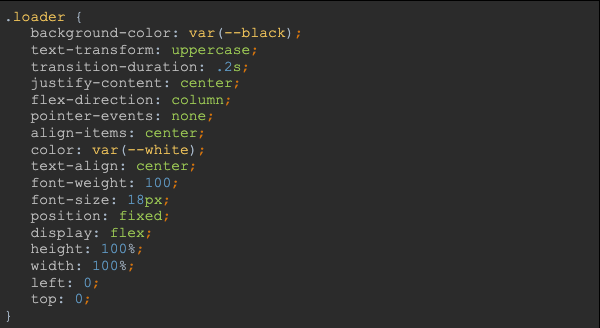
Let's not forget to add styles for our loader:
Now we should be able to see our loader on the served page. Of course, we don't want to show it all the time. We need a function to control its visibility. The controls.js file will also contain all the actions related to dynamic DOM elements.
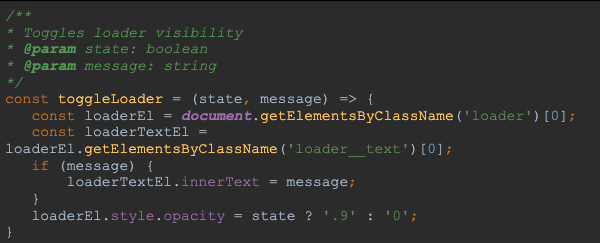
In this case, the element is "hidden" by changing its opacity. This adds a nice stylistic touch. Additionally, its internal text element is modified. I think the loader part can be considered finished.
We can smoothly move to showing and hiding subsequent sections / steps. As in the case of the loader, we will start with their definition in the view:
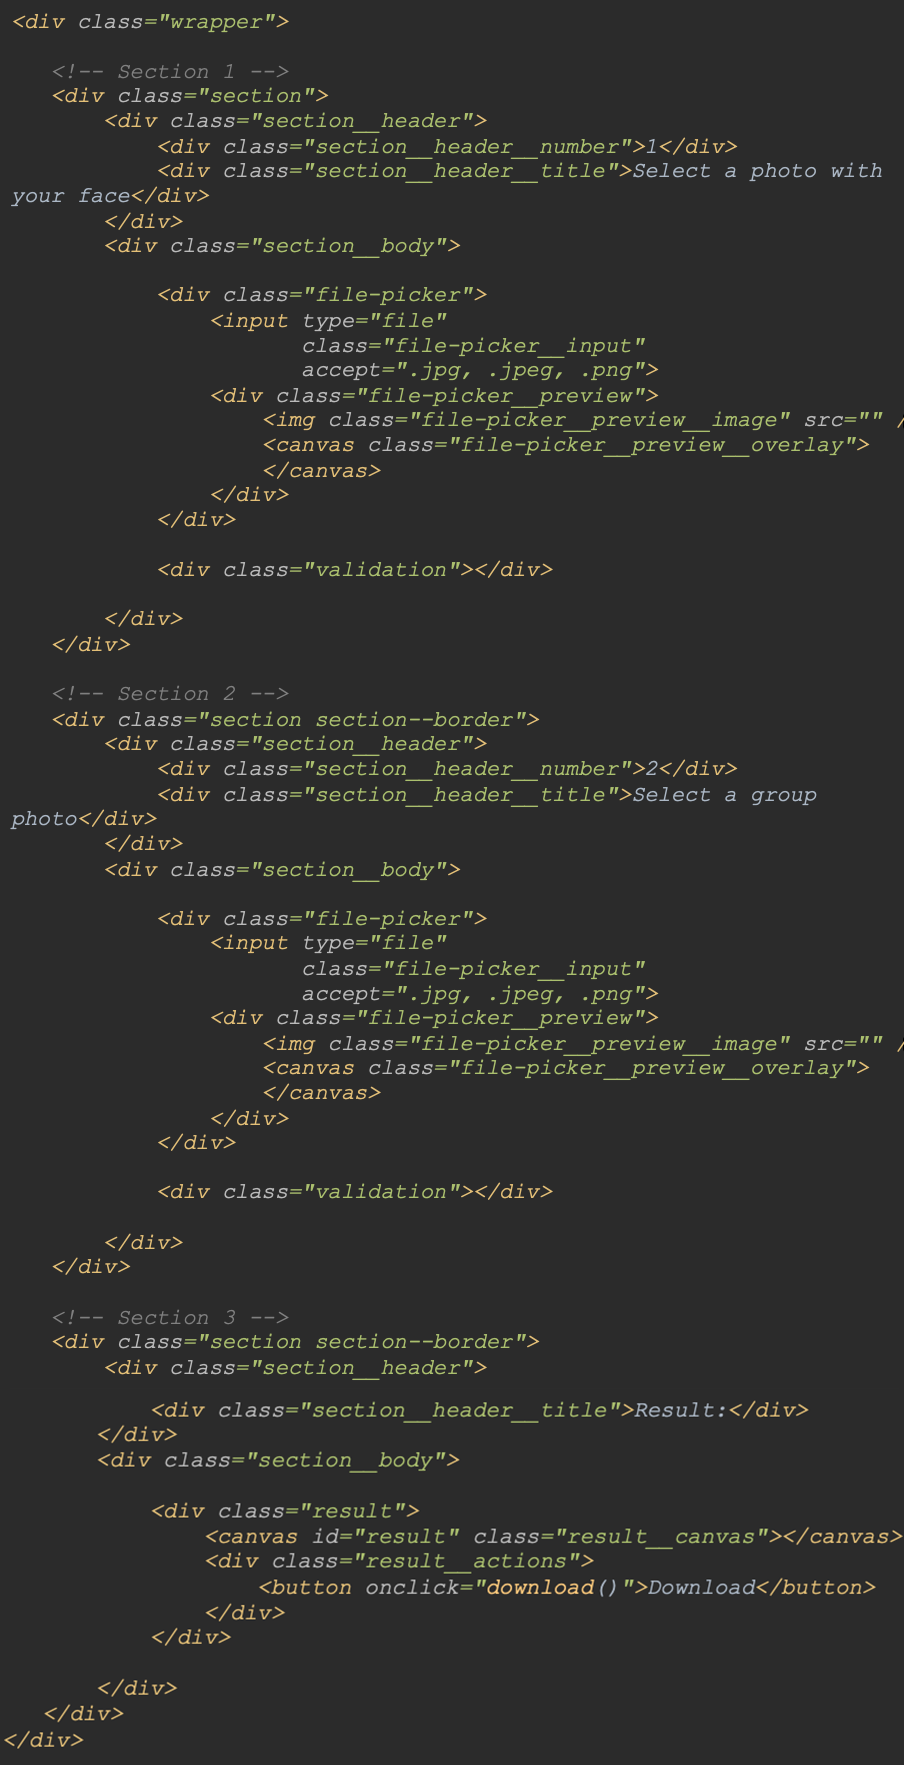
We can easily see a division into 3 sections here. The first two contain a file picker - the first one for adding a reference photo, the second - for a group photo. Finally the third section will include the result. Everything has been placed in a <div> element with ‘.wrapper’ class. Let's move on to its styles:
Style section:
The file pickers has been listed inside the first two sections:
Finally, the result needs to be styled:
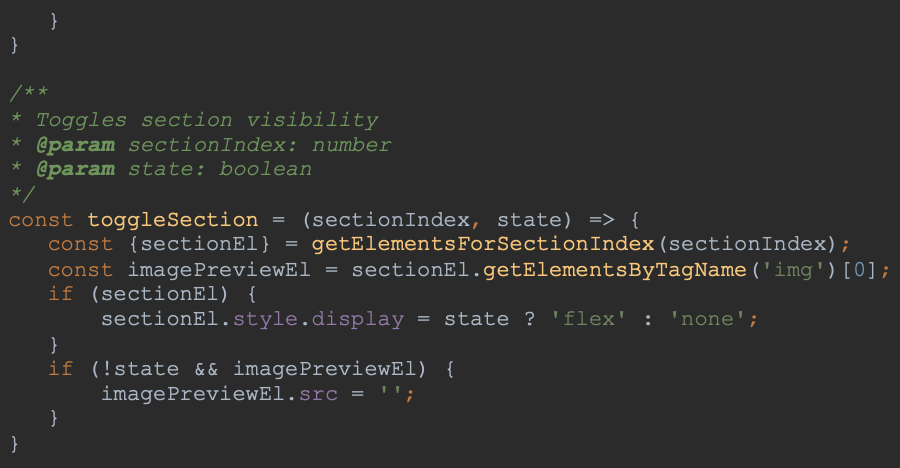
Now we are going to look at the logic of showing the next sections; I have added two functions in the controls.js file. The first one will facilitate our work on the elements inside the section. The second one is responsible for showing and hiding our sections:
In This way, we can smoothly move on to the index.js file, where we need to define the function which will initiate the entire process. Before we are going to use it, let’s turn off the loader to show all sections:

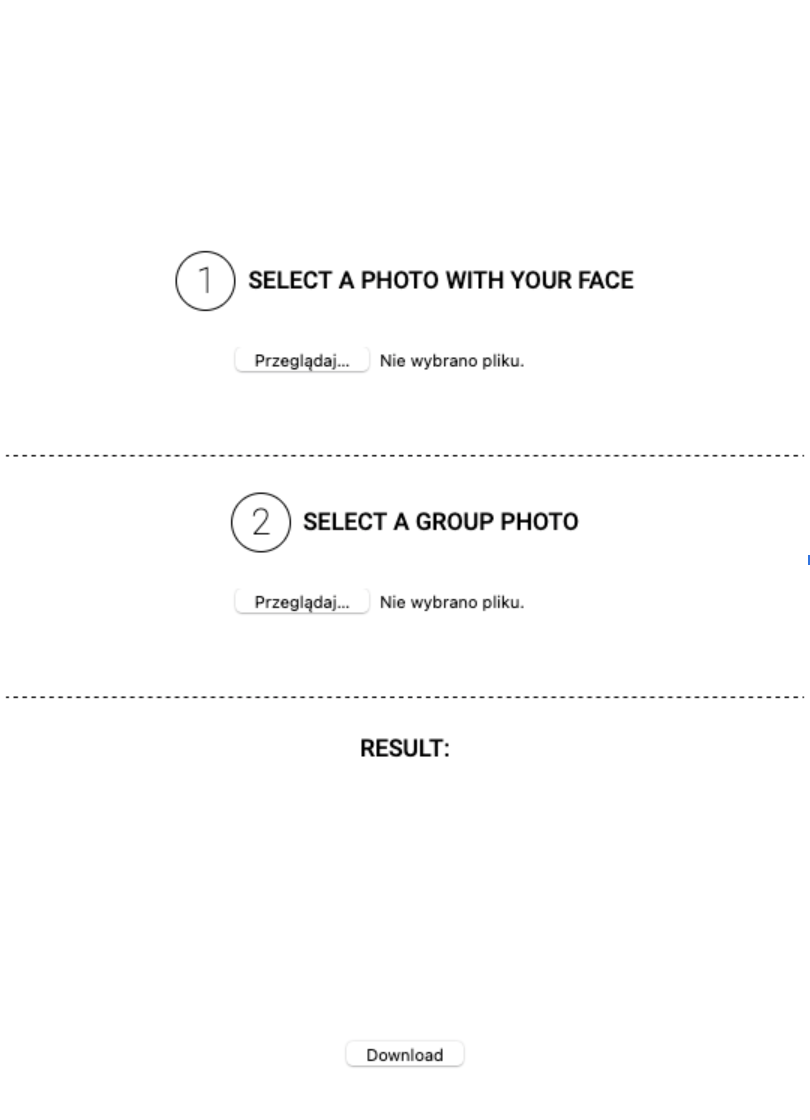
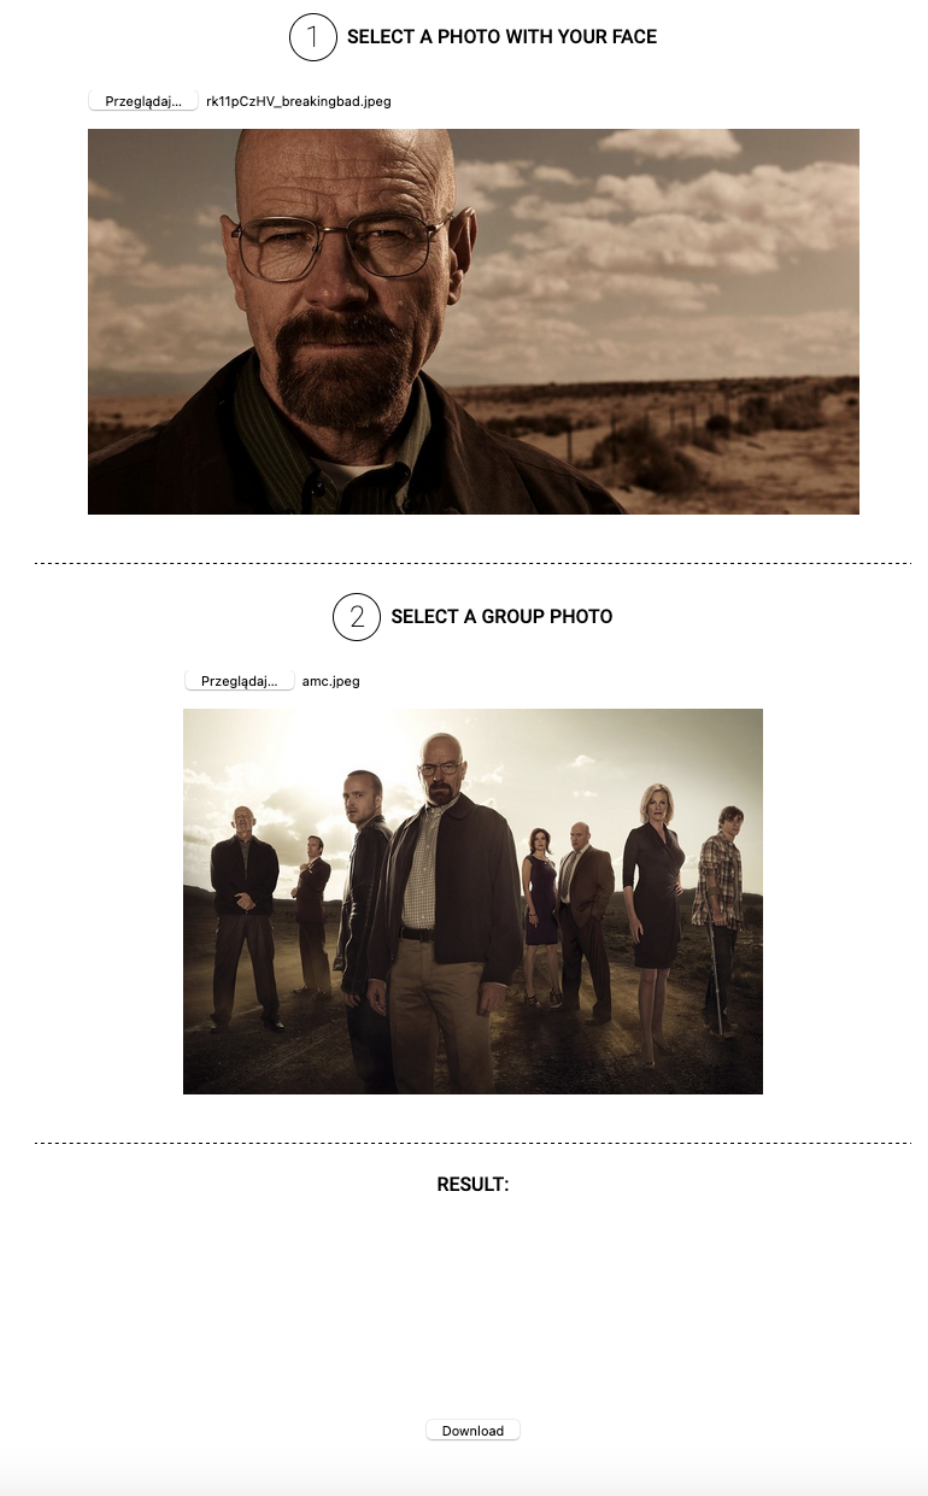
What does the end result look like? I think it’s pretty good. We get a professional, neat layout:
5.7 Support for adding files
Now it is time to handle the logic related to adding files. As you remember, we have two sections that need to be added. I think the best way would be to wait for changes to these two <input> elements:
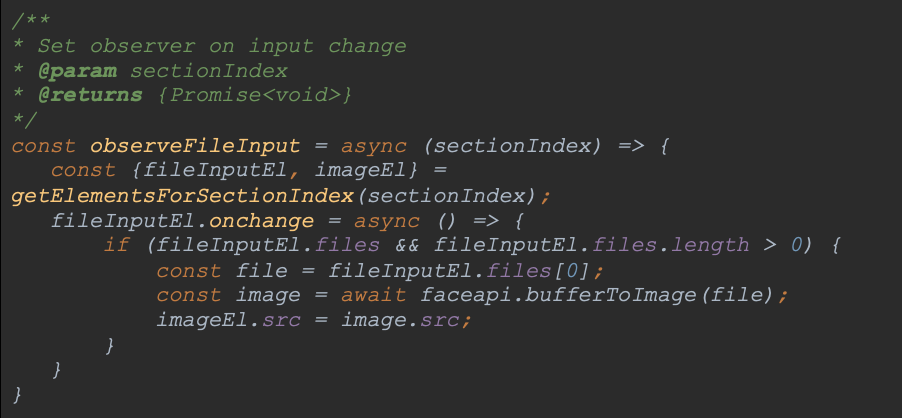
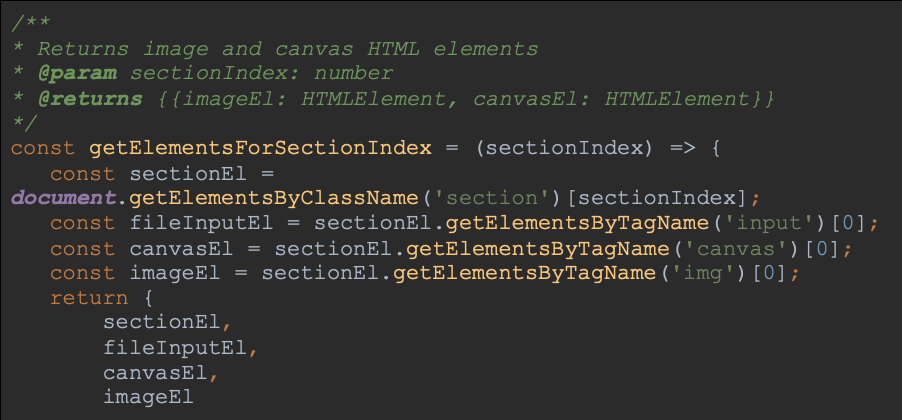
This function takes the index of the section containing the picker as an argument. Then we are going to use the getElementsForSectionIndex function, which we previously defined in controls.js. Thanks to it, we can extract all the elements of interest to us in a given section. Then we can listen for changes in the input and using the faceapi library we will be able to buff this file into the photo, the property of which is assigned to the 'src' attribute of the <img> element. The only thing left for us to do is to add observers to our initialization function:
Bravo! Our pickers should be working now! Here is the effect:
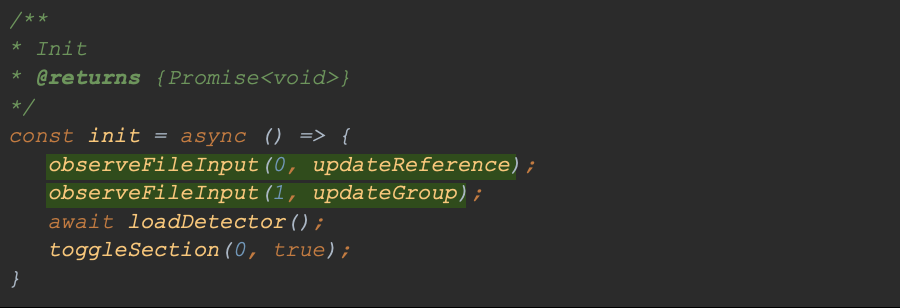
5.8 Detector loading phase
We need a suitable model for face detection. Our library provides a few ones to choose from - see the link for more information. The appropriate weights files can be found in the library's repository at this link. I will use ssd_mobilenetv1_model. How do I load them correctly? In the server.js file we already serve the weights directory statically - we can refer to it. As this is an action related to the detector, I will place the function in the detector.js file:
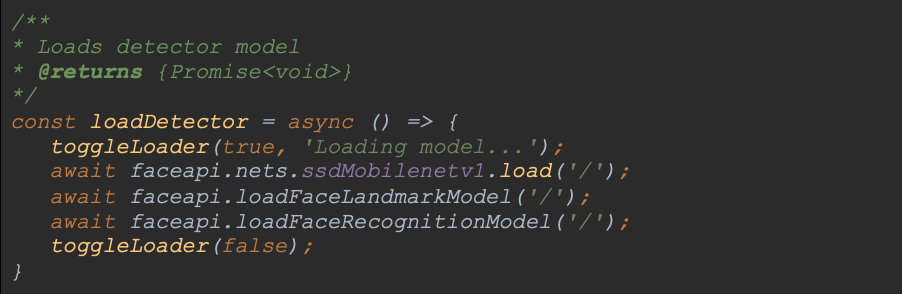
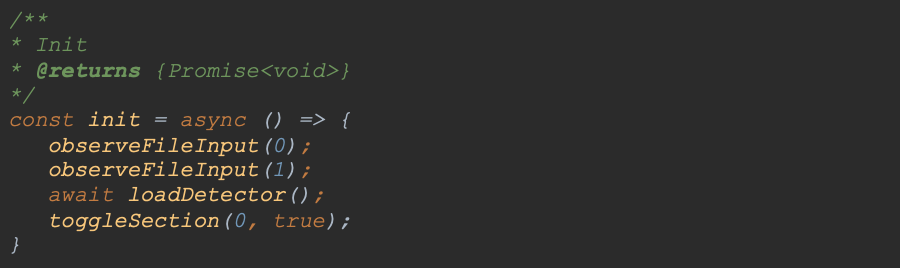
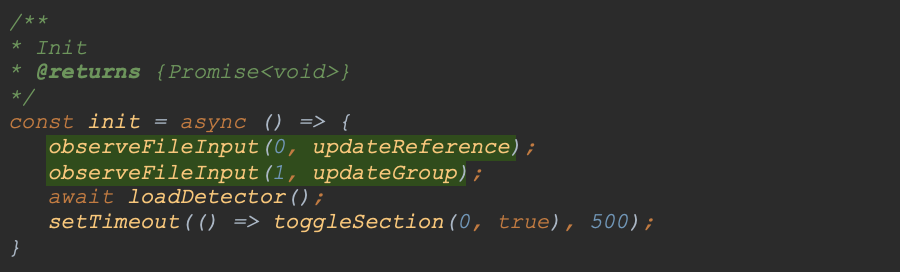
As you can see, this is an asynchronous function - loading the model takes a while. For this reason, I decided to show a loader informing the user about what is happening. Now let's use our function in the main index.js file, hide the next steps as we go along and let's display the first section only:
With the model and view in place, we can get to the point - face detection.
5.9 Viewing photos and detecting faces
The first step is to prepare the Face Detection feature. It will take <img> and <canvas> elements as arguments. In the <img> element we will display the loaded photo and <canvas> will be used to draw the detected faces. The face-api library has ready-made methods to draw the detection result, so we don't have to worry about that. In the detector.js file I place the function:

Please note the faceDetectorOptions variable. It is an instance of the faceapi.SsMobileenetv1Options class. I have assumed a minimum percentage value of certainty whether the result is actually a face - it is 50% - and notified the constructor of this class thereof.
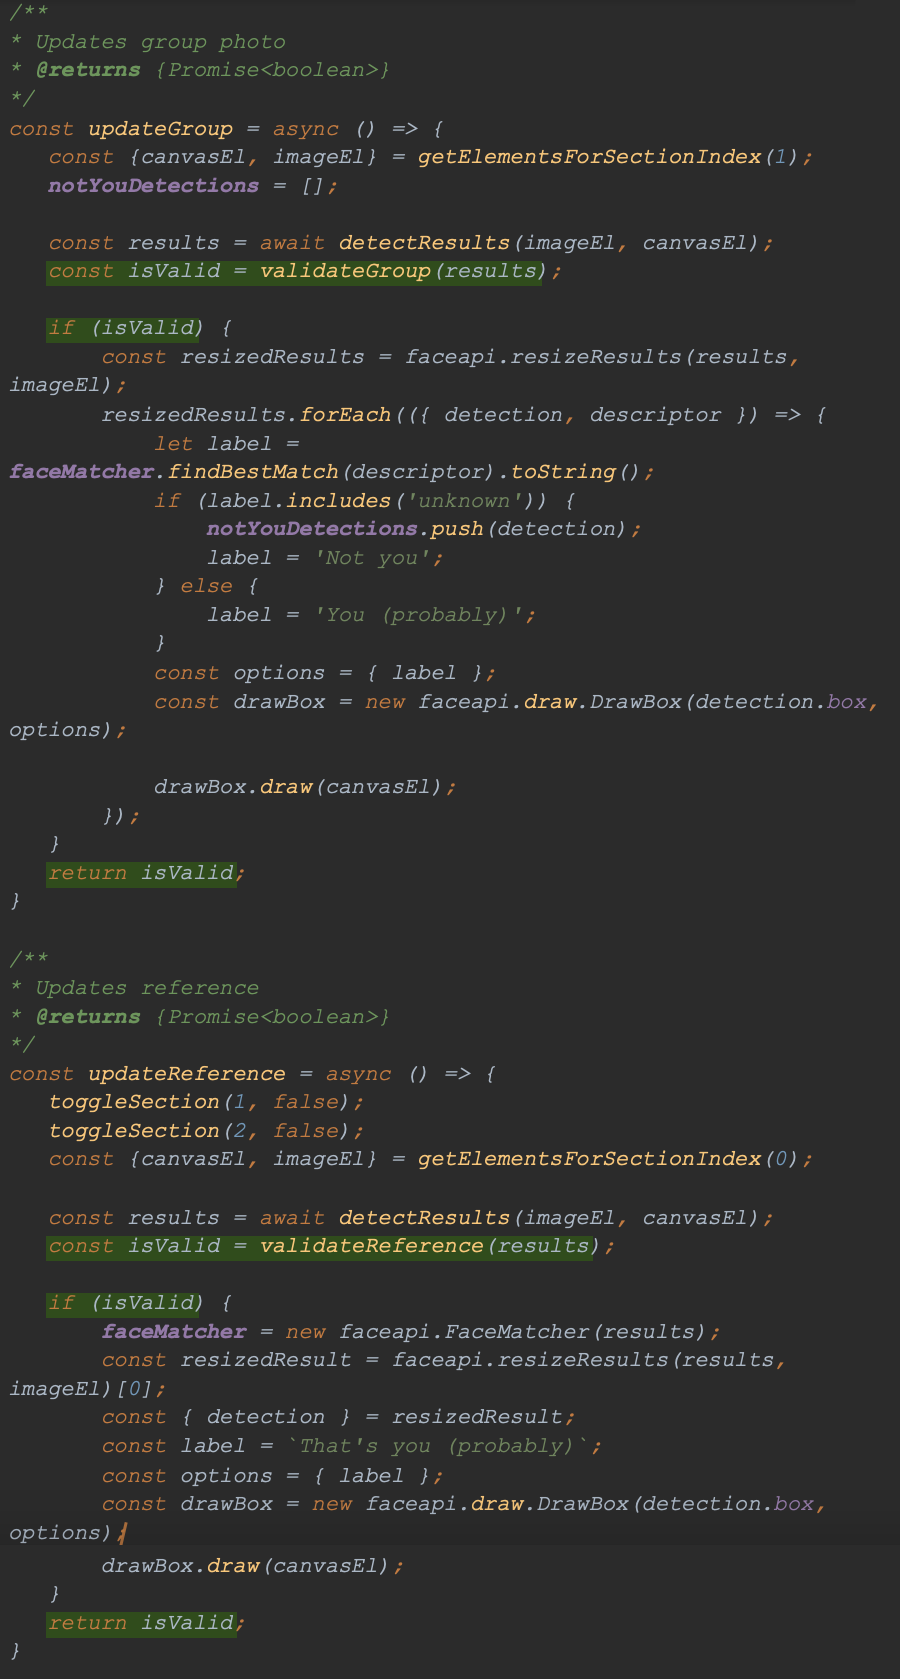
The next step is to prepare a function that will use the above-mentioned detection function in the reference photo:
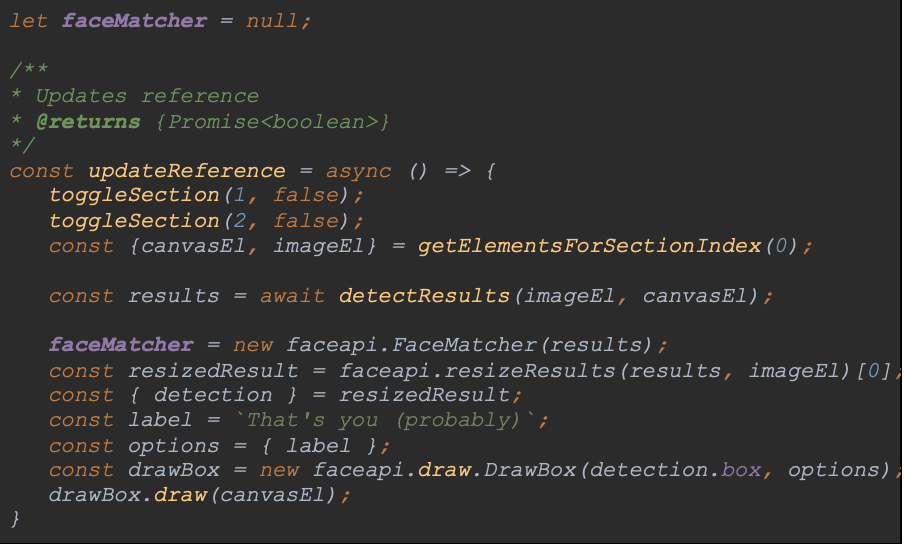
First of all, when loading a new reference photo, I hide all the other sections. Then I use a function to get the section elements (canvasEl and imageEl). I pass these elements as an argument to the face detection function. Then it parses the label names to make them friendlier. The result is drawn on the element <canvas> of the section.
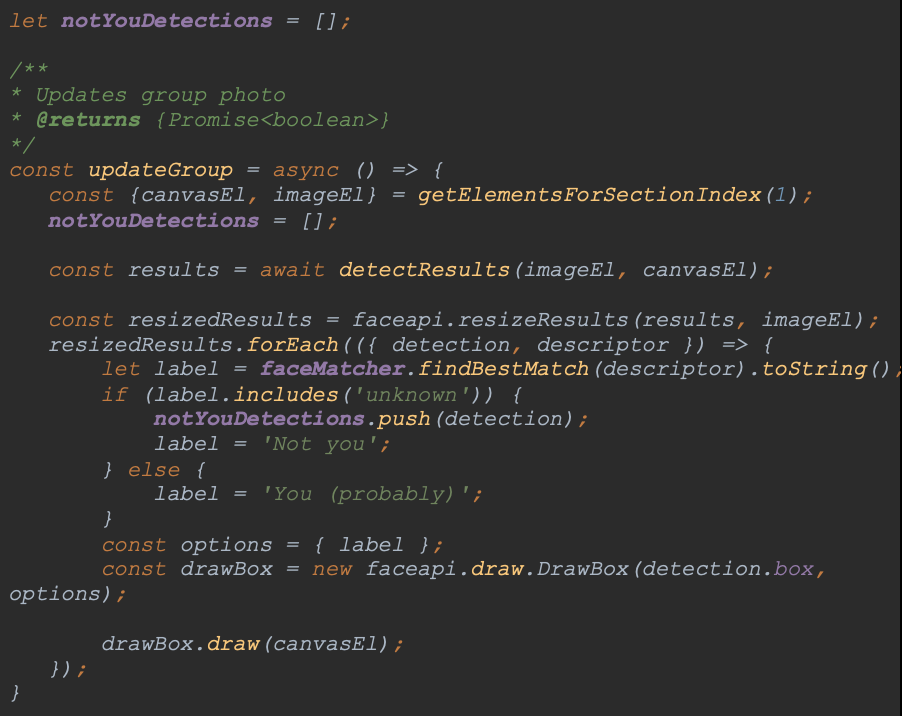
The function for updating a group photo looks similar. The only change is the way we handle multiple faces in one photo:
Let's add these functions as callbacks to our function responsible for handling <input> elements:
We can already observe significant improvement in our application:

5.10 Validation
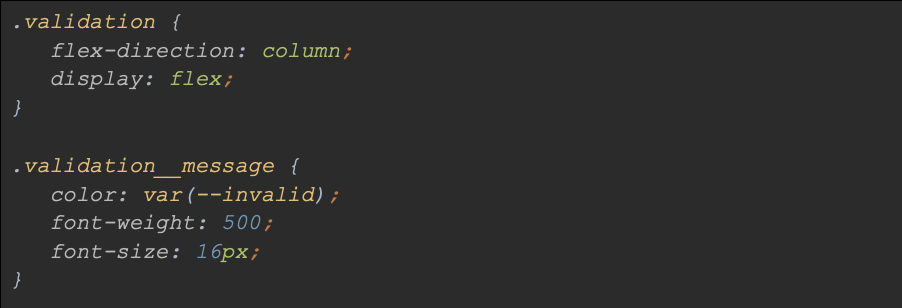
Do we want to handle every photo? Of course not. We are dealing with two types of photos here - reference and group photos. So what is the desired outcome? For the reference photo, we need exactly one face. In a group - more than one. First of all, we need an element where we can display validation messages. You may have noticed that we already have such an item. Each section includes:

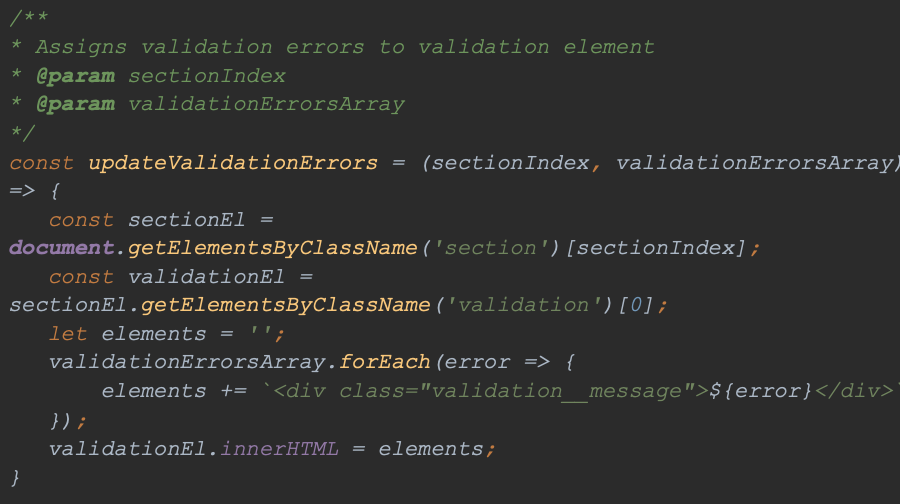
So we can write a function to add these messages (validation.js file):
We can immediately add styles to our validation:
The only thing left to do is to implement our guidelines. In the validation.js file, I have added functions to validate both sections:
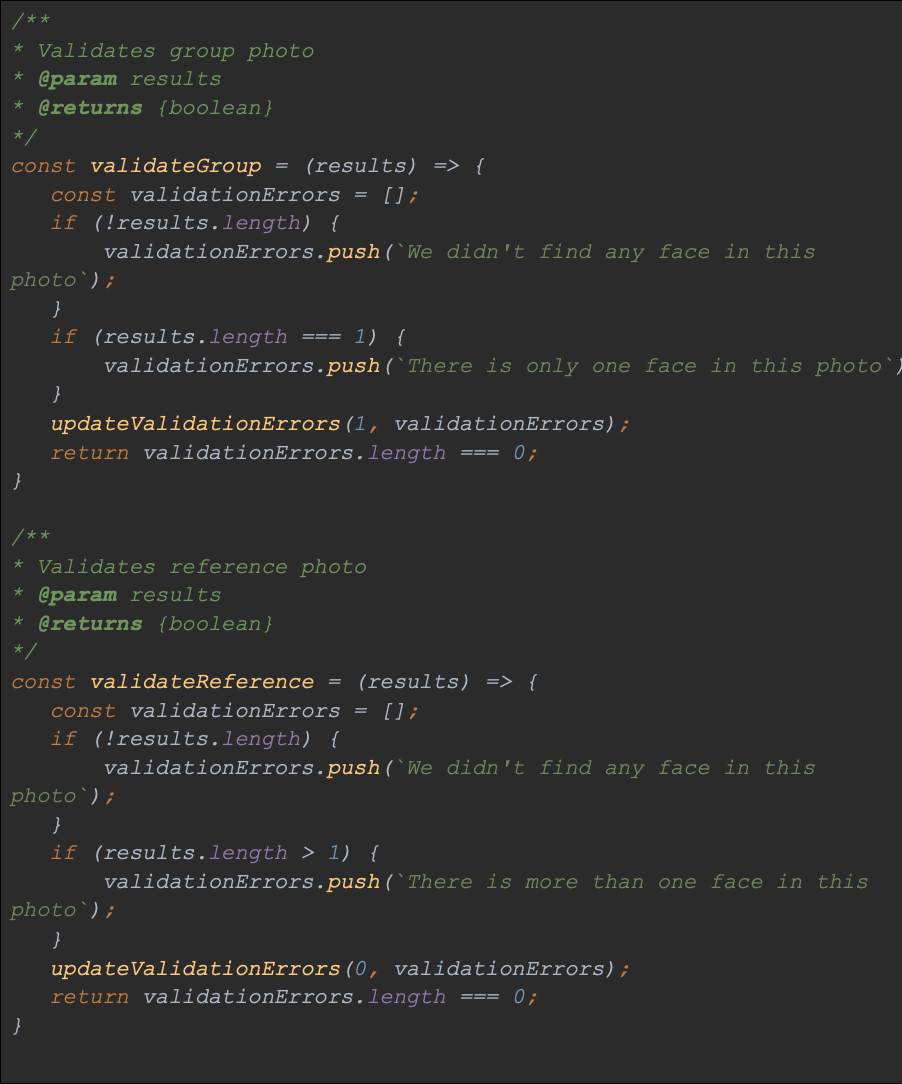
Now, depending on the validation result, subsequent sections will be visible:

In this way, we protected ourselves against unwanted photos.
5.11 Drawing the result
The time has come for the final section. This one is responsible for drawing and blurring detected faces that do not match the reference photo. For this reason, everything has to happen in a single <canvas> element. We need to put a photo in it and then blur the detected faces using the StackBlur library that I mentioned at the beginning:
First of all, we need to match the <canvas> element to the photo that was selected in the second section. I set the height of the canvas element to 320px. So we need to scale the photo being drawn. Then we can use the property box of our detection which contains the coordinates of our detected faces in the photo. Please also note the rounding of argument values in the StackBlur.canvasRGB method. This library doesn't do well with floating point values and our blur wouldn't work properly. We now need to call this function at the right moment. I think the group photo update function will be the best place for that:
5.12 Retrieving the result
The last functionality in our application - downloading the result. After all, we want to save it, right? There is already a download button in our view - we only need its implementation in the index.js file:

Front-end standard. We created the <a> element with the downloadable file, which we then 'clicked'. Here are the end results:
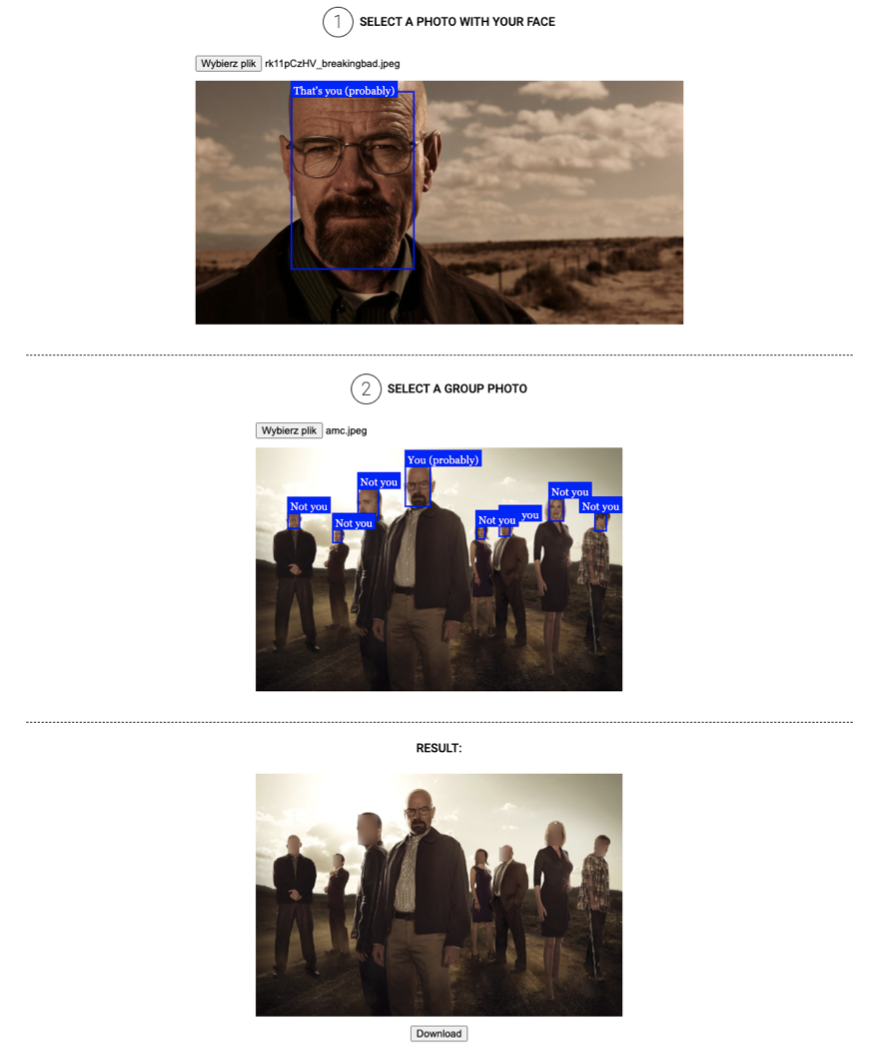
And the downloaded result:

Summary
I am very pleased that you made it all the way here. JS has tons of great libraries that we can do great things with. Remember that today we only barely touched on the possibilities offered by face-api - that's why I encourage you to read its documentation once again.
Please see a link to the article repository here:
https://github.com/tazz544/faces


